Sunday 22 July 2012

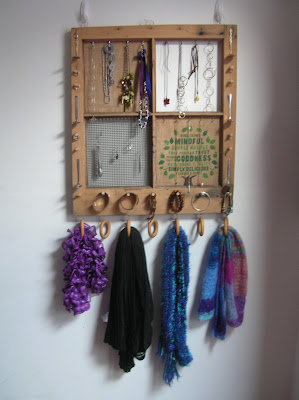
Window Frame Jewellery Organiser


I’d already made Zoe a jewellery organiser for her birthday, but that didn’t even require any power tools.


Clearly it was time to lift my game. As soon as I saw this tutorial from The Borrowed Abode, I knew I had to make my own, since:
a)       I have very little jewellery, and;
b)      I already own a perfectly functional and gorgeous jewellery box

Erm…to the above reasons I annex:
c)       It’s really pretty


 I followed her (clear and excellent) tutorial in the essentials, but I made a couple of amendments to customise it to my jewellery and my complete abject poverty. In addition to or in substitution for her materials, I used:
-          Beading wood
-          Old picture with foam guts
-          Holey shopping bag
-          Curtain rings
-          Eye hooks
-          Spoons

1.       I lasted a couple of minutes chipping off the putty with a screwdriver and hammer before I got bored and smashed the glass and yanked out the pieces. Now I know how fun it is, I’ll be even more tempted by those IN CASE OF EMERGENCY SMASH GLASS fire extinguishers.
2.       Put in the cup hooks now, before the backing panels. I didn’t do this, but I should have – it’s a lot easier to twist them in without the panels obstructing you. Don’t put them too far towards the back of the frame – remember that the back curve of the hook protrudes behind the screw part, so screw them in a couple of centimetres forward of where you want them to end up.
3.       I don’t know what foam core board is, but I suspected that it cost money. A couple of months ago I’d bought a picture from the tip shop because I wanted to upcycle the frame, but I’d kept the picture itself just in case. As it turned out, the inside was foam, or at least something you can stick pushpins in. And trust me, cutting it up was a service to the community.

4.       I wanted a more natural look to go with the wood of the frame, but, again, buying burlap or hessian costs money. Enter Woolworths shopping bag with a gigantic hole frayed in the bottom. The weave was loose and I wasn’t sure it would hold with Mod Podge without unravelling, so I attached it to the foam squares with contact cement, which holds like a boss but takes far longer to dry.
5.       Instead of window screening, I used the thicker and stronger mouse and snake mesh, but only because I have a grandfather with four sheds who hasn’t thrown anything out since 1945. This stuff will not cut with regular scissors – it needs sidecutters. Cut it to the exact size you want it, because your finger bones will bend before it does. 
6.       Instead of square sticks of craft wood, we used beading, which is actually designed for windows. Lawrence drew me a diagram on toilet paper of what it looks like, but sadly I didn’t have the foresight to keep it. It’s the same concept: the square edge lines up with the wire and the side of the frame, but instead of hammering across and into the side, you put the tacks at the top of the wood and hammer them straight down.  
7.       “It doesn’t have to be perfectly even,” Lawrence said, and I looked at him like he’d suggested it wasn’t necessary for McDonalds to sell hamburgers. I wanted the bracelets along the bottom properly spaced, so I measured the total length (60 cm ), subtracted how far I wanted them to come in from the edge (3.5 cm) and divided the number by the number of dowel pieces (7), leaving me with gaps of roughly 7.5 cm.
8.       We picked a slanted bit of wood to lean the drill against so the holes would all be on the same angle, and attached a drill stop collar so they’d all be the same depth. In theory. In reality, all it meant was that I couldn’t blame the tool when they weren’t.

9.       I don’t wear dangly earrings, since they make me feel like a pirate, and not in the Keira Knightley kind of way. I wanted something to keep my studs in, so I put six spoon handles in the vice and bent the spoon up on a 90 degree angle. Attaching them turned out to be difficult. Spoons are to drill bits what Redskins are to teeth: brutal, snapping death. Either pick skinny-handled spoons or use epoxy and glue them instead. 

10.   My grandmother knits scarves for a living so, well, I have a lot of them. I screwed eye hooks along the bottom of the frame with the same spacing as the dowel, then opened up the eye hook on the curtain ring with pliers, attached it and closed it back up again. The rings look tiny, but scarves are surprisingly squishy. The leftover eye hooks I screwed into the top as a substitute for picture hangers.

11.   And that was it! Which was a shame, because then I had to go back to actually writing the essay that was due in two days. And by go back to, I mean start.

Licence Plate Purse


I won’t say this bag is illegal, but if you happen to meet a policeman while wearing it, sidle away slowly then run like the cops are chasing you. Which they might be.

I refused to hand the plates in when my darling was sent to the wreckers. Originally they were part of the memorial wall, but gluing them to the new Wayne letters didn’t seem particularly practical. There are dozens of different projects out there, but I had my heart set on a handbag. This way he could still go everywhere with me, and it was about time I carried him instead of the other way around.

I got the initial inspiration from NynaeveAS’s tutorial. Her bag is fancier than mine: I didn’t want any trimmings to distract from the glory of Wayne. We had to make do with two licence plates rather than three, since as unique as Wayne was, the standard number was all we had to work with.

1.      The plates are 38 cm long. The first needs to be cut at 24 cm (for the front and bottom), leaving a second piece 14 cm long (for the top). Mark a pencil line and cut it with sidecutters.
  1. The second plate forms the sides and the back, and doesn’t need to be cut, but needs to be marked 12 centimetres from each end. Put the plate in a vice and bend it along the marks. The paint will flake a little along the bend, especially if your car was forty years old. Also bend 2 centimetres from each end, making the sides 10 centimetres – this creates an overlap with the front to attach pop rivets.
  2. Take the 24 cm (bottom and sides) piece of plate and bend it 2 centimetres from the edge, and another 10 centimetres from that bend. Bend the 14 cm (top) piece at 11 centimetres – the extra three centimetres will hang down the front of the purse.
  3. The three pieces fit together like this:
  1. Don’t drill the holes for pop rivets before you bend - unless you happened to drink felix felicis lucky potion this morning, your holes probably won’t line up. We put four pop rivets on the front, one each side top and bottom, and two at the back, one each side.
  2. Attach the hinges to the back plate with pop rivets. Rest the top piece on and mark where the hinges are, then file the plate between the marks to create a hinge-sized space for them to fit snugly into – otherwise the whole top will be pushed forward and you’ll have a gap the width of the hinges. Drill hole and pop rivet the hinges onto the top plate.
  3. Cut the vinyl strap to the desired length and melt or punch a hole in each end. Attach in the middle of each side with a pop rivet, using a washer inside and outside to prevent it pulling through.
  4. Line the bag with vinyl: you could just cut and glue each section, but if you have a handy slave to hand-sew it while you sit and work on your Corporations essay, by all means take advantage of him.
  5. Practice your modest smile: you’ll get endless compliments every time you take it out, so make it convincing.
I’m well aware that the fluoro purple dog leash doesn’t precisely match the rest of the purse, but I kind of like that. I feel as though Wayne would approve.

Australian Flag Washing Machine


At one point, I was getting so carried away with artistic fervour that I was basically painting everything that stood still long enough. (Though not quite to the extent of my former housemate James – I woke up one morning to find a live mouse in the humane trap in the kitchen, with a note taped to it saying “Do not release – gone to buy paint”. But I digress.)


It started life as just plain blue, but if you’re going to paint your washing machine, you have to go all out, you know? No point going to Woodstock but not getting stoned and dancing naked on a table. And, well, for someone who wears fluoro green and gold shoes, nothing is too patriotic.
                                                                             
My first stop was the Union Jack. I blew the dust off my measuring tape and figured out the dimensions of the machine lid, then found an image online, pasted it into a Publisher document and sized it to the same dimensions as the lid. That told me how wide the stripes needed to be, so I chalked them out and then masking taped the edges of the lines.

Pretend this photo is of the tape for the white, not the red. You get the idea. 


It’s easier to paint half on top of the tape, because if you’re running the brush along the edges then the paint is more likely to work its way underneath.

While I painted, instead of singing along with my Banjo Party record like I usually do while crafting, I had a chat with my conscience that went something like this:

INNER VOICE: So, hey, remember that time in second year when you failed your open book exam because you watched movies all night and showed up on no sleep with no notes?

ME: Yeah, so?

INNER VOICE: You have an open book exam in two days, Rach. Have you written any notes yet?

ME: ….What’s your point exactly?

INNER VOICE: Oy vey.

After more layers of paint than the Golden Gate Bridge, I repeated the measure-tape-paint process with the red stripes. (I found them harder to measure on the computer since they’re slanted, so I printed them and went old-school ruler on them.)


Embarrassingly, the process for the stars was much the same: measuring the front of the washing machine, sizing the Southern Cross and printing the stars individually. If I’d tried to paint them freehand they would have come out looking more like white-capped waves, so I stuck the print-outs on poster board and cut them out with a Stanley knife to make a stencil. 


In hindsight, I would have moved all the stars up a few centimetres, because even though they’re perfectly even, you can only really tell that they’re even when you’re sitting on the ground. I don’t spend much time on the floor of my laundry room, especially since nobody’s vacuumed in there since we moved in.

Now my only problem is how to hide it when Nan comes to visit. Suggestions?

Northern Territory Trip 2012


My winter holidays were spent on the mainland, quad biking and dune boarding, eating bush tomatoes on the back of a horse, narrowly escaping death on a scooter, sleeping outside in the desert, climbing the highest peak in the Flinders Ranges, swimming in thermal springs under starlight, wandering around sculptures in the middle of an outback paddock, climbing rusted, rickety water towers, nailing my footwear to trees, painting dot art in a little Aboriginal community, visiting pubs festooned with old bras, hand-feeding enormous fish and just generally having the time of my life.

Be warned: you do not want to read this unless you are my grandmother, or somebody else who changed my nappies. I favour metaphors more flowery than the gardens of Buckingham Palace, and I’m long-winded enough to put Scheherazade to shame. 

Seesaw


There’s no gift better than risking life, limb and your favourite pair of overalls to make somebody something, right? My nephew was turning four and I wanted to make him a toy, so when I found this it looked good: small, easy and fun.


 Somehow, it took steroids, or got bitten by a radioactive spider, because it turned into this.


  1. Cut top off two tyres. We didn’t want it too high, since he still only comes up to my hip, so we cut thirty centimetres off the ground. We started with the hand saw – nope – then the circular saw – nope – then the hand saw – yes, but be prepared to sweat – and eventually settled on the angle grinder.

2. Measure, saw and screw wood to each side of the tyre, with four screws on each side. (The two pieces will bend towards each other like Shakespearean lovers, so you may want to screw a block between them just to make the next assembly step a little easier.)


3. Cut a piece of board to the approximate length and width of the top of the tyre. Saw the corners off, because the kids are guaranteed to run into it at some point and the less sharp edges the better. Attach the board with screws, making sure you’re screwing into the wood bracing and not empty air. 

  1. We used gum, which was strong enough to hold Lawrence and I without even a creak of protest, but just to be sure, we screwed a second reinforcing piece underneath the plank along the middle. Please note that the plank is upside down in this photo, and if you put the reinforcing piece on the top you will give your children enormous wedgies.

  1. The last piece of wood is the one that will attach everything together. Measure the width of the plank and the two top boards: the three combined is how long it needs to be. Once you’ve cut it to size, find the middle: line up the edge with one tyre board and draw a pencil line that marks off the width of the board, then repeat for the other end of the piece of wood, leaving you with three sections marked. The middle section should be the width of the plank. Lay the piece of wood on top of the plank, lined up with the middle section, and drill two holes, one each side of the reinforcing piece underneath. These are for the bolts: it’s a good idea to actually put the first bolt in before you drill the second hole, to make sure it doesn’t move. Use a washer on both the underside and the top of the bolt to ensure it won’t pull through the wood and scatter flailing children to the wind.
  1. The last step is, obviously, to attach the plank to the tyres. Rest the piece of wood roughly in the centre of the two boards, and put a couple of screws in to hold it in place. It isn’t bearing any weight, so two on each board should be ample. 
  2. Sand, then sand the sides again, because little fingers are going to be gripping it (hopefully in delight and not in terror).

  1. Paint. Outside, in winter, with rain forecast. Hope the weatherman’s prediction was out by at least a couple of hours.  
  2. Clean melted tyre goo off face. Clean melted tyre goo off glasses. Clean melted tyre goo from hair. Clean melted tyre goo off entire first floor of house. Throw out socks. They’re a lost cause.

  1. Realise that you still have to move the stupid thing over two hundred kilometres to give it to its recipient, and you don’t own a helicopter. Disassemble, wrap in bubble tape, tie to car and pray the cops are busy that night.

I did consider adding handles, which would have been easy: just a couple of large furniture handles screwed in would have been fine. However, I had nightmarish visions of one of the kids falling off with their fingers still holding on and breaking bones. I’ve already dropped my nephew on his head, I don’t need that on my record as well.

Waynification


Short of crashing it into a tree then setting it on fire, there was no way I could really make my new car look like Wayne, but I at least wanted to make it a little easier to pick out in a parking lot.

DASHBOARD COVER

 
When Mum had the audacity to suggest that perhaps I didn’t want the most expensive material in the store for a dashboard cover that was going to sit in the sun and fade, I tore into her like a starving man at a smorgasboard. Two months later, I sat bolt upright at 2 a.m. exclaiming “Why didn’t I buy cheap material for the bottom and use the print for the top?”

When I called Mum to query why she didn’t point this out at the time, she chose to plead the fifth, cheerily disregarding the fact that we don’t actually live in America.

I didn’t want to recover the old one, since I may actually want to sell the car to somebody without the same passion for classic literature, so I laid it on a long roll of butcher’s paper and traced the outline to make a pattern and cut out two pieces of material. Wadding falls apart easily, so I didn’t sew the back and front together and then insert it, like a cushion insert: I laid the two pieces of material right sides together with the wadding on top, and stitched all three together, leaving a small gap to turn it right side out and handstitch it closed.

I bought the thickest wadding I could find. This was a mistake. It’s kind of like having a giant, flat stuffed animal in front of your windscreen. If I was doing it again, I’d use thinner wadding and sandwich it between a couple of pieces of stiffener – I don’t think stiffener alone would be thick enough.

Another discovery was that you get to look at it even more than you expected, because the windscreen reflects the pattern. It’s always there in front of you, like a strange mirage. 


HEAD REST COVERS 


Creating the pattern was interesting, since I had to stab pins into the headrest like nails to hold the paper in place while I traced each section, rolling it as I went to get from the underneath of one side to the other side. I did have the foresight to mark the paper with front, back and top sections, so cutting the material was easy (adding a couple of inches as seam allowance, of course). The actual sewing part was…more interesting.

I’d never sewn on a curve before, at least not without Nan to supervise, gradually get impatient then do it herself. I was laying the pieces of material out flat and trying to get the edges to line up so I could pin them together, and it was not working. Eventually I put the material on the headrest cover, right side down, and pinned along the top of the curve, then took it off before it got stuck and pinned the rest. From there it was just a matter of stitching the raw edges together.

Getting the covers on was like trying to dress a particularly wiggly five year old in a two year old’s clothing. Slipping it on from the top down didn’t work: I had to get one corner in then work the material over the top to the other side. Obviously, I had to leave the underside unsewn, so the material at the bottom was still hanging down. I will never confess to Nan or Aunty Barbara that I hate hand stitching so much that the bottom of the headrest covers are held together with duct tape.

STEERING WHEEL COVER


I followed this tutorial, but let’s face it, a steering wheel is a giant circle: there’s only so many variations of how to make a cover for it. I hadn’t realised just how visible the interior of the cover would be: I think I expected the elastic to be magnetic and seal the edges together. Next time I would probably line it, or at least pick a material with a decent backside. No, I don’t mean material with a Betty Boop print. 

CD VISOR

Clearly, Justin Bieber wasn’t doing a good enough job of driving people insane and so God decided to invent bias tape. Behold and admire the CD holders, since they are the first and the last things I will ever make with the horrible stuff.

The tutorial from Puking Pastilles was very clear and detailed, but it kind of glossed over exactly how thick the project gets: by the time I’d reached ten layers of fabric with interfacing plus elastic, the bias tape I’d bought was too thin to wrap around it and my sewing machine had declared its intention to pack up and move to Hawaii.

GEARSTICK COVER


This project started with ripping the gearstick cover to pieces (which makes it sound like I used bare hands and brute strength, but actually I used a Quick Unpick). Cotton alone would have been too flimsy, but I didn’t see the point in replacing one plain boring leather cover for another plain boring leather cover, so I decided to take it apart, glue the new material to the old material and put it all back together again. I only removed the top section and tore out one seam, but working with the cover flat let me wrap and glue the material around the bottom without the elastic scrunching it, and sew straight lines along the seams I wasn’t unpicking. It would be possible to do it just by gluing, but it might not have held its shape as well.

With blithe disregard for the fact that they didn’t match anything, at all, in any sense, I cut each end off the shoelaces from my Batman Converse, stitched the two sections together and fed it through as the cord.

It took me three tries to get the Velcro sewn back on close-enough-to-properly. If you’re going to take something apart and then try to recreate it, for the love of god take proper photos of it first.

CUP HOLDER


 I really should have taken a photo of the cup holder before I took it off to spray paint it, since I couldn't figure out how to put it back together again.

WINDOW WINDER COVERS


They’re literally just a circle two inches in diameter wider than the window knob, with a piece of elastic sewn in. (Well, I needed something else that matched my pirate duck.)


 Some kind of tacky plastic animal is an old Wayne tradition, though the ducks automatically lose by virtue of not being blueberry-scented.


POCKET ORGANISER


Originally I was going to make the organiser for the car so I had somewhere to dump my wallet and phone, but since the CD visor freed up the console for that, I stuck it on my bedroom wall instead. It probably would have turned out a lot better if I hadn't been in a 'I do not measure things or pin things!' mood. Also, I ran out of stiffener and so I had to cut up Zoe's cereal box. She won't mind. I hope.


Thursday 19 July 2012

Tea Wreath


If I was an architect, the world would have a whole lot more Leaning Tower of Pisas.


I bow down to Kirsten of Kojo Designs, because her tutorial was so clear and straightforward I actually managed to make it without once screeching “WHAT? WHAT DOES THAT MEAN?”. Unfortunately, the side of the cupboard was a little too small – I categorically refuse to confess that the wreath was a little too big.It's lucky I just made this because it was pretty, not because I actually drink tea.