I’d already
made Zoe a jewellery organiser for her birthday, but that didn’t even require
any power tools.
Clearly it
was time to lift my game. As soon as I saw this tutorial from The Borrowed Abode, I knew I had to make my own, since:
a) I have very little jewellery, and;
b) I already own a perfectly functional
and gorgeous jewellery box
Erm…to the
above reasons I annex:
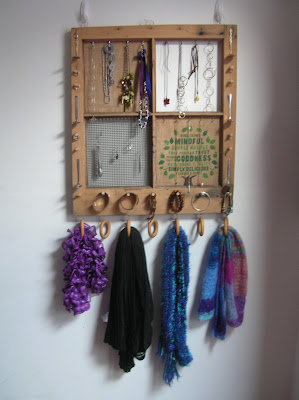
c) It’s really pretty
I followed
her (clear and excellent) tutorial in the essentials, but I made a couple of
amendments to customise it to my jewellery and my complete abject poverty. In
addition to or in substitution for her materials, I used:
-
Beading
wood
-
Old
picture with foam guts
-
Holey
shopping bag
-
Curtain
rings
-
Eye
hooks
-
Spoons
1.
I
lasted a couple of minutes chipping off the putty with a screwdriver and hammer
before I got bored and smashed the glass and yanked out the pieces. Now I know
how fun it is, I’ll be even more tempted by those IN CASE OF EMERGENCY SMASH
GLASS fire extinguishers.
2.
Put
in the cup hooks now, before the backing panels. I didn’t do this, but I should
have – it’s a lot easier to twist them in without the panels obstructing you.
Don’t put them too far towards the back of the frame – remember that the back
curve of the hook protrudes behind the screw part, so screw them in a couple of
centimetres forward of where you want them to end up.
3.
I
don’t know what foam core board is, but I suspected that it cost money. A
couple of months ago I’d bought a picture from the tip shop because I wanted to
upcycle the frame, but I’d kept the picture itself just in case. As it turned
out, the inside was foam, or at least something you can stick pushpins in. And
trust me, cutting it up was a service to the community.
4.
I
wanted a more natural look to go with the wood of the frame, but, again, buying
burlap or hessian costs money. Enter Woolworths shopping bag with a gigantic
hole frayed in the bottom. The weave was loose and I wasn’t sure it would hold
with Mod Podge without unravelling, so I attached it to the foam squares with
contact cement, which holds like a boss but takes far longer to dry.
5.
Instead
of window screening, I used the thicker and stronger mouse and snake mesh, but
only because I have a grandfather with four sheds who hasn’t thrown anything
out since 1945. This stuff will not cut with regular scissors – it needs
sidecutters. Cut it to the exact size you want it, because your finger bones
will bend before it does.
6.
Instead
of square sticks of craft wood, we used beading, which is actually designed for
windows. Lawrence
drew me a diagram on toilet paper of what it looks like, but sadly I didn’t
have the foresight to keep it. It’s the same concept: the square edge lines up
with the wire and the side of the frame, but instead of hammering across and
into the side, you put the tacks at the top of the wood and hammer them
straight down.
7.
“It
doesn’t have to be perfectly even,” Lawrence
said, and I looked at him like he’d suggested it wasn’t necessary for McDonalds
to sell hamburgers. I wanted the bracelets along the bottom properly spaced, so
I measured the total length (60 cm ), subtracted how far I wanted them to come
in from the edge (3.5 cm) and divided the number by the number of dowel pieces
(7), leaving me with gaps of roughly 7.5 cm.
8.
We
picked a slanted bit of wood to lean the drill against so the holes would all
be on the same angle, and attached a drill stop collar so they’d all be the
same depth. In theory. In reality, all it meant was that I couldn’t blame the
tool when they weren’t.
9.
I
don’t wear dangly earrings, since they make me feel like a pirate, and not in
the Keira Knightley kind of way. I wanted something to keep my studs in, so I
put six spoon handles in the vice and bent the spoon up on a 90 degree angle.
Attaching them turned out to be difficult. Spoons are to drill bits what
Redskins are to teeth: brutal, snapping death. Either pick skinny-handled
spoons or use epoxy and glue them instead.
10.
My
grandmother knits scarves for a living so, well, I have a lot of them. I
screwed eye hooks along the bottom of the frame with the same spacing as the
dowel, then opened up the eye hook on the curtain ring with pliers, attached it
and closed it back up again. The rings look tiny, but scarves are surprisingly
squishy. The leftover eye hooks I screwed into the top as a substitute for
picture hangers.
11.
And
that was it! Which was a shame, because then I had to go back to actually
writing the essay that was due in two days. And by go back to, I mean start.


